Sunday, May 31, 2009

seventeen-hundreds

[updated to include recipe]

So, I guess I like strawberries. I'm using them frequently to bake pretty ; they just go with so much! Plus, they are about in season, so when I buy them they tend to be deliciously sweet. However, the ones I got this time around for these cupcakes were a bit wanting. As a result, the cake itself wasn't as "I'M SUPER FULL OF STRAWBERRIES!!" as I wanted. Instead, it was a hint of strawberry plus the (better, because I bought some extras later) ones on top with cream cheese icing or chocolate ganache. I filled some of them with strawberry whipped cream as well to round out the flavor.


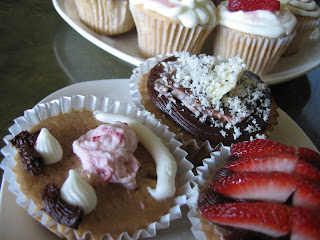
I was also really tired when I made these (hadn't slept the night before), so my Martha Stewart gene was lacking while I decorated them. I made them for a picnic in which we all came from 300 years ago.

Strawberry Cupcakes
12 tbs butter (1 1/2 sticks)
4 eggs + 2 yolks
2 3/4c cake flour
1/2c milk
1 1/2c sugar
3/4tsp salt
2 1/2tsp baking powder
1tsp vanilla extract

2c roughly sliced strawberries
enough sugar to sweeten strawberries to your liking

Preheat the oven to 350F. (Ensure that your ingredients are all room temperature!!)

In a small saucepan, place strawberries and some sugar over medium heat and cover. Once the mixture begins to simmer, reduce heat to low. Cook for ~15 minutes, covered, until the mixture is liquidy. Allow to cool some, and then place the mixture in a blender and puree until smooth. Set aside and allow to cool to room temperature.

In a large mixing bowl, cream the butter, sugar, salt baking powder, and vanilla until the mixture is fluffy, appx 5 mins. This will take longer if you are using a hand blender.

dd the eggs to the mixture one by one, beating well after each egg. Slowly blend in one-third of the flour and then the milk. Add another third of the flour and then add the strawberry mixture in slowly. Finally, add the final third of flour. You will likely need to scrape the bowl down several times.

Pour into cupcake/muffin liners, filling up the cups until they are 1/2" from being full. Bake 20-22 mins until a cake tester inserted in the middle comes out clean. Remove from the oven and allow to cool 5 mins. Remove them from the muffin pan and allow the cakes to cool completely. Decorate however you like! (I recommend cream cheese frosting or strawberry whipped cream.)

Sunday, May 24, 2009

ew

As if Domino's Tuscani Pastas weren't bad enough, now they are serving them bowls of bread. They take the pasta and put it in what looks like enough dough to make a pizza.
So. Gross.


Also, about the focaccia, when I made it, it was good, but it's not quite how I want it, so once I fix the recipe to my liking, I'll have it up here.

Sunday, May 10, 2009

skip to my lou

I'm not a morning person and thus not a breakfast person. I mean to say, I rarely wake up in time to eat anything more than something quick and on-the-go like a cup of yogurt. However, like most other people, I love breakfast foods. This morning, I was up early, so I treated myself to pancakes.. mmm. Based on the title, you'd think I used buttermilk, but I didn't. (Oh no!!!)


Some pancake tips:
Let your batter rest for 5 or 10 minutes before putting them on the stove; this lets the flour absorb the liquid more fully and develops the protein structure, leading to a tastier pancake. You can even cover it and place it in the refrigerator overnight if you want so that when you wake up you can just pour 'em onto a hot griddle without the fuss and muss. You'll have a clean kitchen minus one pan. What a lovely morning!

Also, try using pastry flour. You can usually find a small-ish bag of pastry flour at your grocery store, so you won't end up with gobs of it lying around that you never use. It makes pancakes lighter and fluffier. I like using it because I love a crispy pancake, but it seems like every time I make them crispy, the inside is tough. Pastry flour gives me a crispy cake with an inside that melts in my mouth if I happen to sneak one directly off the griddle. Once it cools, though, it may not steal the old M&Ms slogan, but it's darn tasty and noticeably more delicate than using all-purpose.

Coming Soon: Focaccia

Saturday, May 9, 2009

welcome to your morning

Croissants are ubiquitous in the US, appearing throughout supermarkets and in bakeries everywhere. Even Starbucks always has croissants, whether plain or filled (mostly with chocolate). The following recipe does not make your typical, soggy, overly chewy, squished croissant. There is so much wrong with most croissants that it hurts me to think that people actually enjoy eating them! If your croissant does not have a slightly (or not so slightly) crispy exterior with a tender, decadent interior that makes you weep a little (or is that just me?) when you eat it with jam or your favorite spread/condiment, then your croissant should not be consumed! (I like parentheses today.)

Sorry for the lackluster photograph; most of them had already been eaten, and the pictures were taken in haste. This was the prettiest one I had left. The previously eaten ones were much nicer! I will post another when I make some more.

Do not feel overwhelmed by the length of this recipe; I made it very wordy during the dough-turning stage to prevent any confusion. It is actually very simple but isn't the easiest thing to describe without pictures.


Once again from The King Arthur Flour Baker's Companion:
Croissants
This recipe will make 24 croissants. The dough responds well to being refrigerated after prepared (up to 3 days) or even frozen (up to three months). When thawing, allow the dough to rest at room temperature for four hours or leave in the fridge overnight. Then, feel free to proceed and roll and form the croissants. This dough can also be used to make delicious danishes.

Dough:
2 large eggs plus enough warm water to make 2c liquid
1/3c sugar
5 1/2 to 6c all-purpose flour
2 1/4 tsp instant yeast
1/2c nonfat dry milk (optional, but yummier)
1 scant tbs salt
1 tsp vanilla extract (if making danishes or sweet filled croissants)
2tbs butter, melted

Butter:
1 3/4c (3 3/4 sticks) slightly chilled butter
1/2c all-purpose flour
flour for sprinkling

Beat eggs with water until blended and pour into a large mixing bowl. Add 1 tbs of the sugar, 3c of the flour, and the yeast. Mix until well blended. Cover and set aside at room temperature. In a separate mixing bowl, blend together 2 1/2c of the remaining flour, the rest of the sugar, the dry milk, and the salt. Set aside.

Now, mix the butter and 1/2c flour until they're smooth and well blended. Lightly flour a piece of plastic wrap or parchment paper, place the butter-flour mixture on it, and pat into an 8-inch square. Cover the butter and place it in the fridge on a flat surface for at least 30 mins. (The added flour helps the butter to keep its shape while rolling.)

Back to the dough. The yeast should have gotten to work and made the sponge bubbly and expanded by now. Give it a stir and blend in the vanilla if you're using it for the recipe as well as the melted butter. Stir in the flour-milk-salt mixture, mixing until you have a soft but kneadable dough. I suggest letting the dough rest for 20 mins at room temp at this point if you have the time. It will help the dough be less sticky when kneading and help you resist the temptation to add too much flour.

Sprinkle flour on your kneading surface, turn out the dough, and knead for 8 to 10 minutes, until it's bouncy and elastic. Resist the temptation to add too much flour! Your croissants will not taste nearly as good. If it's sticking to your hands, keep your work surface well-floured, and you may even use some baking spray on your hands. As you knead, it will become less and less sticky. Also, once the dough goes in the fridge, it will be less sticky and makes it easier to roll out, so don't fret too much. You can always add more flour, but you can't take it out! Wrap the dough loosely, and refrigerate it for at least 30 mins.

Now for the time-consuming part of the recipe: making the turns. You will be giving the dough a total of four turns, which means rolling out dough-wrapped butter, folding it in thirds, rotating 90 degrees such that it looks like a book about to be opened, and rolling again. Here are more detailed instructions:

Flour your work surface. Roll it into a 12"x12" square. Place the butter square in the center of the dough, at a 45-degree angle so that it looks like a diamond on top of a square. Fold the flaps of dough over the dough until they meet in the middle. Pinch and seal. Use a little water if needed. Ensure there aren't any air bubbles and that the corners have enough dough around them.

Roll this square into a 20"x10" rectangle. You may want to use a ruler or yardstick to verify the size. When the dough is the right size, use a pastry brush to dust the flour off the top of the dough.

Fold the long section into thirds over one another as you would fold a letter, lining up the sides and corners of dough very carefully. You may use a little bit of water to keep the edges from slipping when rolling again. Rotate the dough such that the opening of the top fold is facing right, like a book about to be opened. Roll out the dough again and complete another fold. Wrap in plastic wrap and place in your refrigerator at least 30 mins to allow the dough and butter to firm up. You have completed two turns. Repeat the turning process twice more, and then place in the fridge again for at least 30 mins.

Roll out the dough one final time into a manageable size, say 8"x12", and cut in half with a pizza roller or sharp knife. Roll one half of the dough into a 12"x18" rectangle and trim the edges. Cut the dough in thirds lengthwise, and in half across the middle. Cut these smaller 9"x4" rectangles diagonally into two triangles, and then cut a half-inch notch in the center of the short side. You should have 12 triangles. Roll these up starting with the notched center and the bend the ends into the familiar crescent shape. Be sure to rotate the ends forward. Also make sure that the dough's tip is tucked under the roll, stretching a little if you need to.

Place these on a lightly greased or parchment-lined baking sheet. Cover and let proof for until doubled in size (20-30 mins using instant yeast). During that time, preheat the oven to 425F. Once fully risen, brush with an egg wash (1 egg+1tsb water, beaten) and place in the oven for 18-22 mins. They will turn a deep golden brown, even where the layers of dough overlap. Try not to underbake the croissants; the insides will be moist and spongy.

Tada! Fresh croissants. You can pat yourself on the back now.

I'm proud of you for reading this far; as a reward I'll let you in on a secret. If you're extra lazy, buy some puff pastry from your grocery store. Thaw it in the fridge, roll it out--think between 1/4" and 1/8" thick--, cut, and shape in the same manner as described above. The croissants will be puffier than the above bread baker's croissants to the point that they kinda shatter when you pull them apart. They won't be as good as made from homemade puff pastry (the above recipe is puff dough, which is studier and a little chewier), but are a much better option than the Pillsbury or store-brand croissants if you want something quick and easy.